← Back to blogVoltar ao blog

How to make motion graphics videos with Claude Code

You can make a finished motion graphics video without opening a video editor. Claude Code writes the animation as code, a renderer turns that code into an MP4, and you do the part a director does: decide what the film says, then look at it and say what to change.

This guide covers the setup and the way of working. It doesn’t depend on a particular style, brand or voice. You bring your own idea, and Claude does the building.

An example: a 31 second Reel made this way, from one prompt to an approved cut in an afternoon.

How it works

The video is a Remotion project: React components that draw each frame as a function of time. Claude writes and edits those components. Remotion renders them in a headless browser and encodes the result with ffmpeg. Since everything is code, every change is a precise edit, and the film can be rebuilt or reused at any time.

youbrief, script,feedback Claude Code+ a motion skillwrites the code Remotionstills, previews,final render you review what it renders
The loop: you brief, Claude builds, Remotion renders, you review.

Step 1: set up your machine

  • Claude Code, running in a terminal on your machine.
  • A motion design skill. We use cinetic by Leonxlnx (GitHub, MIT licence), installed with npx skills add Leonxlnx/cinetic.
  • Node 22 or newer, ffmpeg, Python 3.11 or newer and a headless Chromium. You don’t need to install these by hand. Ask Claude to check what is missing and set it up.
  • A Remotion company licence if your company has more than three employees. Individuals and smaller companies use it for free.

A skill is a folder of instructions and scripts that Claude loads when a task matches it. Claude can write Remotion code without one, but the result tends to look generic. A good motion skill gives Claude a designer’s habits: it writes a brief before any code, times every move to a beat, works out sound effects from the picture, and checks its own renders before showing you anything. Read the skill’s README once, so you know which steps it will take and which questions it will ask.

Step 2: brief Claude in one message

Start a new folder, open Claude Code and say what the film is for. These are the decisions only you can make, and they are expensive to change later:

Use the cinetic skill to make a motion graphics video.
What it is about: <your product, your idea, or the message>
Where it plays: <Instagram Reel, YouTube, a landing page, a presentation>
Shape: <portrait 1080x1920 / landscape 1920x1080 / square>
Length: <a target, or "as long as it needs">
Sound: <music, sound effects only, a voice-over, or silent>
Brand: <colours, fonts, logo file, or "invent one">
Tone: <calm, playful, technical, cinematic...>

Two of these deserve a second look. Shape: design for the platform from the start. A landscape film cropped to a vertical Reel looks wrong, because the layout was never meant for it. Sound: say early whether you want music, because a good skill plans the sound together with the picture.

Claude will reply with a brief and a treatment: the idea in one line, the story beat by beat, and every word that will appear on screen. It asks you to approve that before building anything. Read it properly. Changing a sentence costs nothing at this stage. Changing it after the build means reworking scenes.

Step 3: give it a script, with notes

If you already know what the film should say, write it yourself and put the visual ideas in brackets, like notes for an animator:

Here is the script. Scene ideas are in brackets.

<line 1>
(what the viewer should see while this is said)
<line 2>
(a problem shown, not described)
...
(the ending: be creative)

You keep control of the message, and Claude turns each bracket into a scene. Leave a few brackets open (“be creative”, “surprise me”) and you will get ideas you would not have had yourself.

For a longer film, ask Claude to split the work: one shared plan for timing, colours and rules, then the scenes built in parallel by subagents. It works like briefing a small team of animators, and it keeps a long film consistent.

A typed prompt opens a wall of tiles
A problem shown as data
An idea that grows into a crowd

Step 4: review frames, not videos

Even a short film takes minutes to render, so you won’t iterate by watching video. Ask Claude for stills at the key moments and for contact sheets: one image with a frame every few hundredths of a second, each labelled with its time. A sheet shows you pacing, layout and dead moments in a few seconds.
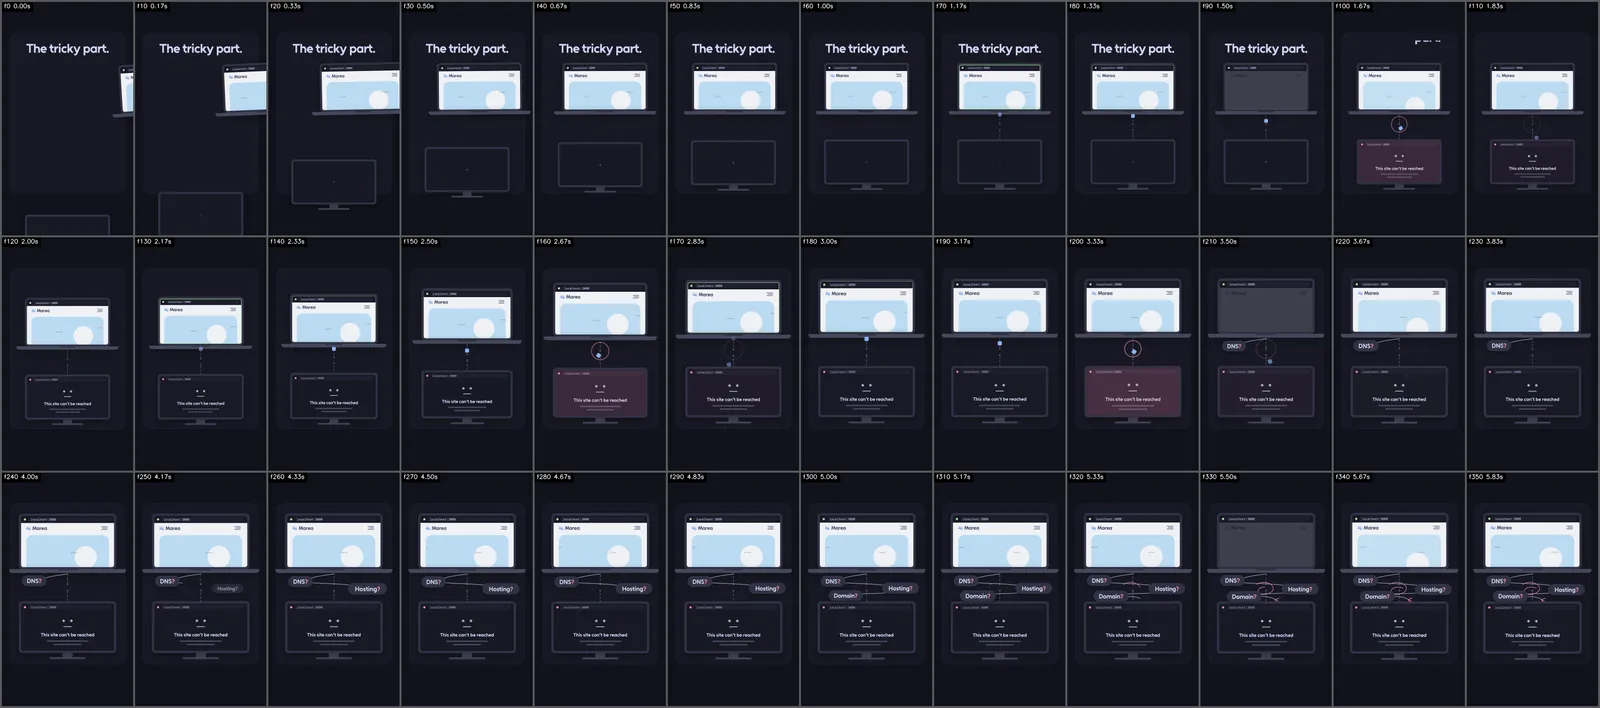
A contact sheet of 36 frames from one scene, each labelled with its frame number and time
A contact sheet of one scene. You can judge its rhythm without pressing play.

When something is off, say what you see, not how to fix it. Short lists work best:

- the cards in the middle look flat, make them more detailed
- the cycling is too fast to follow, slow it down a little
- remove the chime on every item
- the labels on the zoom out are clutter, remove them

Claude changes what you named and leaves the rest alone. If it changes more than you asked for, tell it so. That is feedback too.

Step 5: get a second opinion

Before you give your own notes, ask Claude to run a director review in a subagent. That is a fresh instance that never saw the build, given only the contact sheets and a critic’s brief (good motion skills ship one). It has no attachment to the work, so it is blunt: it scores the cut and lists what is weak, such as a soft opening, a dead stretch, or text that competes with the voice. Let Claude fix those first. Your own notes can then be about taste rather than mechanics.

Step 6: sound and voice

A motion skill can derive the sound effects from the animation itself, so a click lands on the frame where a button is pressed and a whoosh peaks where the camera moves fastest. Your job is the character: music or none, how busy, what to remove.

For a voice-over you need a text-to-speech model. You can use a hosted service, or run an open model on a rented GPU and keep full control. We wrote a separate guide for the second option: AI voice-overs on a cloud GPU, with ComfyUI on Modal. Once you have the recordings, ask Claude to time the picture to the spoken words, so things land on the word they illustrate.

Step 7: render, and keep an eye on it

There are two kinds of render:

  • Preview. Sharp and fairly quick. Watch it in full before anything else.
  • Master. The final file, often with real motion blur, made by rendering several sub-frames per frame and blending them. It looks filmed rather than computed, and it is slow. On a laptop without a strong GPU, a 30 second master took us about two hours.

Three habits save time:

  • Never start a master on a cut you haven’t watched as a preview.
  • Run one render at a time and close what you can. Rendering is heavy on memory.
  • Ask Claude to watch the render: “check every 20 minutes and tell me if it stops”. A render that halts on a quality check can otherwise sit there for hours before anyone notices.

At the end, ask for the platform version you need. For Instagram we ask for 30 fps H.264 with the file’s index at the start (often called fast start), so the sound plays from the first second while the video loads.

Step 8: make the next one cheaper

When you are happy with a film, ask Claude to write down the process: what stays the same on every film (shape, colours, sound, ending) and the problems it hit on the way. Keep that playbook in the project, or ask Claude to save it to its memory. Your next film starts from a working project and a known recipe instead of a blank folder.

Checklist

  1. Install Claude Code and a motion skill, and let Claude install the rest.
  2. Brief in one message: what it is about, where it plays, shape, length, sound, brand, tone.
  3. Approve the copy before anything is built.
  4. Give a script with scene notes in brackets, and leave room for ideas.
  5. Review stills and contact sheets, and run a director review before your own notes.
  6. Give feedback as short lists of what you see.
  7. Approve the preview, then render the master and have Claude watch it.
  8. Ask for a playbook, so the next film is faster.

If you would like help with a video like this, or with getting AI-built software into production, run our free technical diagnostic or see our work.

Como fazer vídeos de motion graphics com o Claude Code

É possível fazer um vídeo de motion graphics acabado sem abrir um editor de vídeo. O Claude Code escreve a animação em código, um renderizador transforma esse código num MP4 e você faz a parte de um realizador: decide o que o filme diz, depois vê o resultado e diz o que mudar.

Este guia trata da configuração e da forma de trabalhar. Não depende de um estilo, de uma marca ou de um tom em particular. A ideia é sua, e o Claude faz a construção.

Um exemplo: um Reel de 31 segundos feito desta forma, de um único prompt a um corte aprovado numa tarde.

Como funciona

O vídeo é um projeto Remotion: componentes React que desenham cada frame em função do tempo. O Claude escreve e edita esses componentes. O Remotion renderiza-os num browser headless e codifica o resultado com o ffmpeg. Como tudo é código, cada alteração é uma edição precisa, e o filme pode ser reconstruído ou reaproveitado a qualquer momento.

vocêbrief, guião,feedback Claude Code+ skill de motionescreve o código Remotionimagens, previews,render final você revê o que é renderizado
O ciclo: você passa o brief, o Claude constrói, o Remotion renderiza, você revê.

Passo 1: prepare a sua máquina

  • O Claude Code, a correr num terminal na sua máquina.
  • Uma skill de motion design. Nós usamos a cinetic de Leonxlnx (GitHub, licença MIT), instalada com npx skills add Leonxlnx/cinetic.
  • Node 22 ou mais recente, ffmpeg, Python 3.11 ou mais recente e um Chromium headless. Não precisa de os instalar à mão. Peça ao Claude que veja o que falta e o instale.
  • Uma licença de empresa do Remotion se a sua empresa tiver mais de três funcionários. Particulares e empresas mais pequenas usam-no de graça.

Uma skill é uma pasta com instruções e scripts que o Claude carrega quando uma tarefa lhe corresponde. O Claude consegue escrever código Remotion sem nenhuma, mas o resultado tende a parecer genérico. Uma boa skill de motion dá ao Claude os hábitos de um designer: escreve um brief antes de qualquer código, acerta cada movimento com o ritmo, deduz os efeitos sonoros a partir da imagem e verifica os seus próprios renders antes de lhe mostrar seja o que for. Leia o README da skill uma vez, para saber que passos vai seguir e que perguntas vai fazer.

Passo 2: passe o brief ao Claude numa só mensagem

Crie uma pasta nova, abra o Claude Code e diga para que serve o filme. Estas são as decisões que só você pode tomar, e mudá-las mais tarde sai caro:

Usa a skill cinetic para fazer um vídeo de motion graphics.
Sobre o quê: <o seu produto, a sua ideia ou a mensagem>
Onde passa: <Reel do Instagram, YouTube, uma landing page, uma apresentação>
Formato: <vertical 1080x1920 / horizontal 1920x1080 / quadrado>
Duração: <um objetivo, ou "o tempo que for preciso">
Som: <música, só efeitos sonoros, um voice-over, ou sem som>
Marca: <cores, tipos de letra, ficheiro do logótipo, ou "inventa uma">
Tom: <calmo, divertido, técnico, cinematográfico...>

Dois destes pontos merecem uma segunda leitura. Formato: pense na plataforma desde o início. Um filme horizontal recortado para um Reel vertical fica mal, porque o layout nunca foi pensado para isso. Som: diga cedo se quer música, porque uma boa skill planeia o som em conjunto com a imagem.

O Claude responde com um brief e um tratamento: a ideia numa linha, a história momento a momento e todas as palavras que vão aparecer no ecrã. Pede-lhe que aprove isso antes de construir o que quer que seja. Leia com atenção. Mudar uma frase nesta fase não custa nada. Mudá-la depois da construção obriga a refazer cenas.

Passo 3: entregue um guião, com notas

Se já sabe o que o filme deve dizer, escreva o guião você mesmo e ponha as ideias visuais entre parênteses, como notas para um animador:

Aqui está o guião. As ideias para as cenas estão entre parênteses.

<frase 1>
(o que o espectador deve ver enquanto isto é dito)
<frase 2>
(um problema mostrado, não descrito)
...
(o final: sê criativo)

Você mantém o controlo da mensagem e o Claude transforma cada parêntese numa cena. Deixe alguns parênteses em aberto (“sê criativo”, “surpreende-me”) e vai receber ideias que não teria tido sozinho.

Para um filme mais longo, peça ao Claude que divida o trabalho: um plano comum para o timing, as cores e as regras, e depois as cenas construídas em paralelo por subagentes. Funciona como passar o brief a uma pequena equipa de animadores, e mantém coerente um filme longo.

Um prompt escrito abre uma parede de quadrados
Um problema mostrado como dados
Uma ideia que cresce até ser uma multidão

Passo 4: reveja frames, não vídeos

Mesmo um filme curto demora minutos a renderizar, por isso não vai iterar a ver vídeo. Peça ao Claude imagens dos momentos principais e contact sheets: uma imagem com um frame a cada poucas centésimas de segundo, cada um com o seu tempo. Numa contact sheet vê o ritmo, o layout e os momentos mortos em poucos segundos.

Uma contact sheet com 36 frames de uma cena, cada um com o número do frame e o tempo
Uma contact sheet de uma cena. Dá para avaliar o ritmo sem carregar no play.

Quando algo não está bem, diga o que vê, não como se corrige. Listas curtas resultam melhor:

- os cartões do meio parecem planos, dá-lhes mais detalhe
- a sequência passa depressa demais para se acompanhar, abranda um pouco
- tira o sinal sonoro em cada item
- as etiquetas no zoom out só atrapalham, tira-as

O Claude muda o que indicou e deixa o resto como está. Se mudar mais do que pediu, diga-lho. Isso também é feedback.

Passo 5: peça uma segunda opinião

Antes de dar as suas próprias notas, peça ao Claude que faça uma revisão de realizador num subagente. É uma instância nova, que nunca viu a construção e só recebe as contact sheets e um brief de crítico (as boas skills de motion trazem um). Não tem apego ao trabalho, por isso é direta: dá uma nota ao corte e lista o que está fraco, como uma abertura frouxa, um troço morto ou texto que compete com a voz. Deixe o Claude corrigir isso primeiro. Assim as suas notas podem ser sobre gosto e não sobre mecânica.

Passo 6: som e voz

Uma skill de motion consegue deduzir os efeitos sonoros a partir da própria animação, por isso um clique cai no frame em que se carrega num botão e um whoosh atinge o pico onde a câmara se move mais depressa. O seu papel é definir o carácter: com música ou sem, quão carregado, o que tirar.

Para um voice-over precisa de um modelo de text-to-speech. Pode usar um serviço alojado ou correr um modelo open source numa GPU alugada e manter o controlo total. Escrevemos um guia à parte para a segunda opção: voice-overs com IA numa GPU na cloud, com o ComfyUI no Modal. Quando tiver as gravações, peça ao Claude que acerte a imagem com as palavras ditas, para que cada coisa apareça na palavra que ilustra.

Passo 7: renderize e fique de olho

Há dois tipos de render:

  • Preview. Nítido e razoavelmente rápido. Veja-o do princípio ao fim antes de mais nada.
  • Master. O ficheiro final, muitas vezes com motion blur verdadeiro, obtido renderizando vários sub-frames por frame e misturando-os. Parece filmado em vez de calculado, e é lento. Num portátil sem uma GPU potente, um master de 30 segundos demorou-nos cerca de duas horas.

Três hábitos poupam tempo:

  • Nunca comece um master de um corte que não viu em preview.
  • Faça um render de cada vez e feche o que puder. Renderizar gasta muita memória.
  • Peça ao Claude que vigie o render: “verifica a cada 20 minutos e avisa-me se parar”. Caso contrário, um render que pare numa verificação de qualidade pode ficar ali horas até alguém reparar.

No fim, peça a versão para a plataforma de que precisa. Para o Instagram pedimos 30 fps em H.264 com o índice do ficheiro no início (o chamado fast start), para que o som toque desde o primeiro segundo enquanto o vídeo carrega.

Passo 8: torne o próximo mais barato

Quando estiver satisfeito com um filme, peça ao Claude que escreva o processo: o que se mantém igual em todos os filmes (formato, cores, som, final) e os problemas que encontrou pelo caminho. Guarde esse playbook no projeto, ou peça ao Claude que o guarde na memória dele. O próximo filme parte de um projeto que funciona e de uma receita conhecida, em vez de uma pasta vazia.

Lista de verificação

  1. Instale o Claude Code e uma skill de motion, e deixe o Claude instalar o resto.
  2. Passe o brief numa só mensagem: sobre o quê, onde passa, formato, duração, som, marca, tom.
  3. Aprove o texto antes de se construir seja o que for.
  4. Entregue um guião com notas de cena entre parênteses e deixe espaço para ideias.
  5. Reveja imagens e contact sheets, e faça uma revisão de realizador antes das suas próprias notas.
  6. Dê feedback em listas curtas do que vê.
  7. Aprove o preview, depois renderize o master e peça ao Claude que o vigie.
  8. Peça um playbook, para que o próximo filme seja mais rápido.

Se quer ajuda com um vídeo assim, ou para pôr em produção software feito com IA, faça o nosso diagnóstico técnico gratuito ou veja o nosso trabalho.